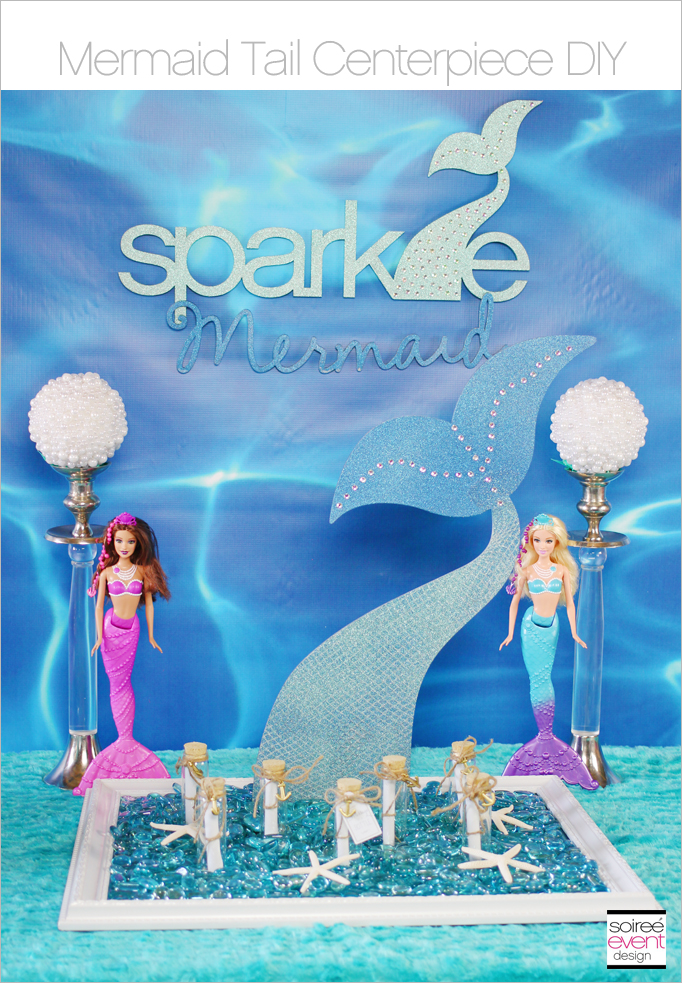
Hey party peeps! Today I’m going to show you How to make a Mermaid Tail Centerpiece! like the one seen in my recent Sparkle Mermaid Party. Click here to see the full party post. I love creating custom centerpieces with laser wood cut pieces. Ten23 Designs is my go-to company for all of my laser wood cut needs. I simply send them the graphic I would like cut and they cut it out of wood, acrylic and even vinyl decals! For this centerpiece I requested wood and also asked for a base that the tail could sit into so that it would sit upright on the table. See below for the step-by-step tutorial on how I created it.
HOW DID SHE DO THAT?
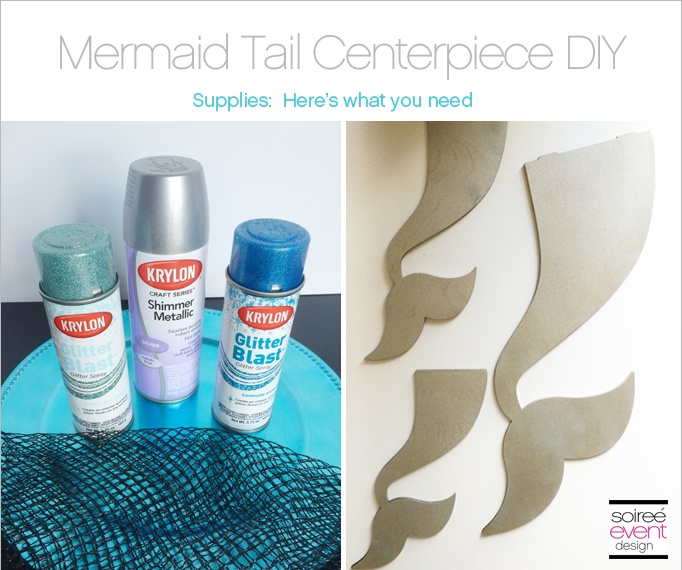
HERE’S WHAT YOU’LL NEED:
• 22″ tall wood cutout of the mermaid tail & wood base
• Silver spray paint (Krylon Shimmer Metallic)
• Glitter spray paint (Krylon Glitter Blast™ Glitter Spray in Sparkling Water & Sapphire Shimmer colors)
• netting
• tape
GIRLFRIEND TIP: Be sure when you order your Mermaid Tail from Ten23 Designs that you request the base also so it will stand upright on your table.
HERE’S HOW YOU DO IT!
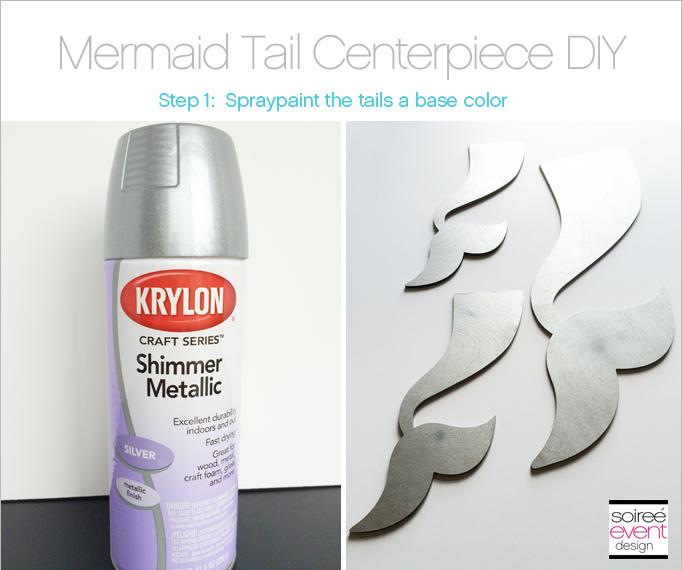
Step 1: SPRAYPAINT THE TAILS WITH A BASE COLOR
Spraypaint the tails with a base color. I used a silver shimmer metallic spray paint.
GIRLFRIEND TIP: When choosing a base color, be sure to use one that will contrast nicely with your glitter spray paint color so you can see the scales easily when you’re done.

Step 2: WRAP THE TAIL WITH NETTING
Wrap the tail with a netting material. You can use rope netting or even fishnet stockings would work. Be sure to secure it tightly with tape on the backside. How cute is that rainbow duct tape!
GIRLFRIEND TIP: I actually used the netting that my apples come wrapped in from the grocery store! What??!! I know! It was super elastic and allowed me to wrap it around the curves of the mermaid tail perfectly!
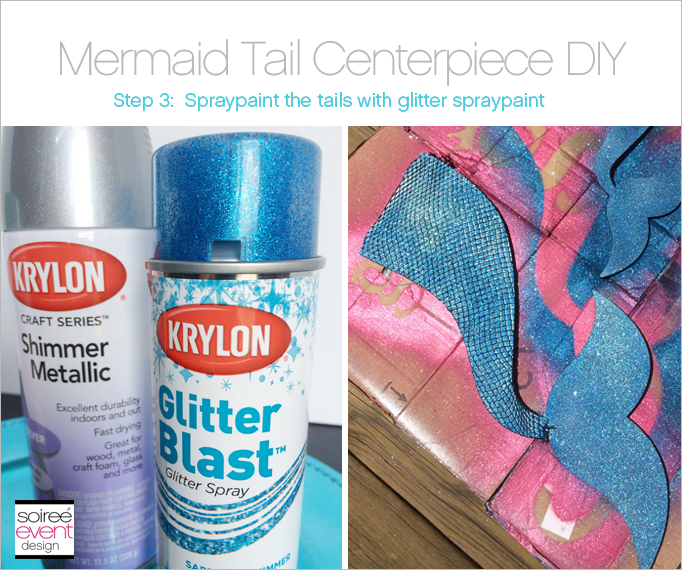
Step 3: SPRAYPAINT THE TAIL WITH A GLITTER SPRAYPAINT
Once you have the netting secured on the tail, flip it over so that taped side is down and paint the entire tail with the glitter spraypaint. Then let it fully dry.
GIRLFRIEND TIP: I actually used two different colors. I started with the darker blue and then went over with the lighter blue leaving some spots darker blue to add some cool visual color shifts.
Step 4: REMOVE THE NETTING
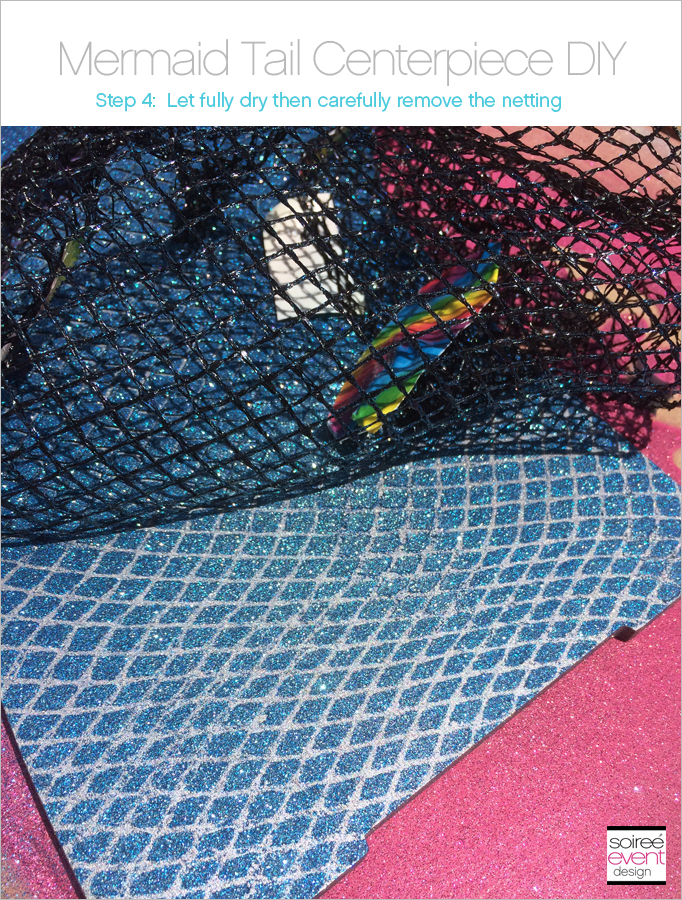
Once it’s fully dry, carefully peel back and remove the netting. You will see that the glitter paint adhered to the tail only on the areas that were exposed through the holes in the netting while the actual netting material allows the base coat to show through creating a scale effect. How cool is that! Now you see why it’s important for the base color to be a contrast color to the scales. I wanted a more muted look so I used silver as my base coat.
GIRLFRIEND TIP: When removing the netting, be sure to hold it upright and loosen the tape on the back first then lay it back down and carefully peel back the netting from the tail starting from the bottom to the top.
Step 5: ADD SPARKLY RHINESTONES
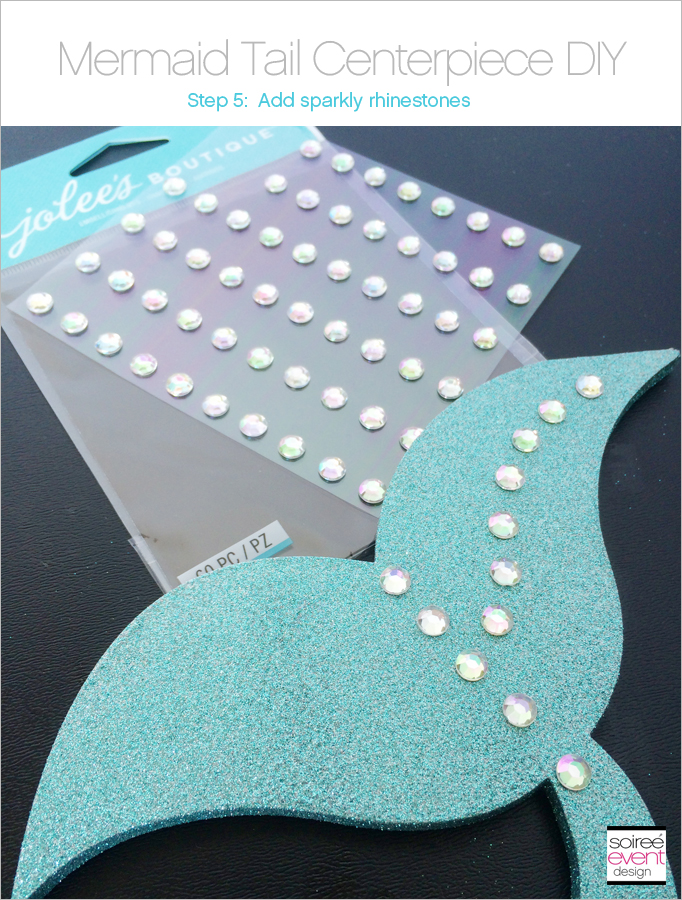
Now for the fun part! Decorate your tail with rhinestones in any pattern you wish. I used a simple wave pattern using rhinestone stickers.
GIRLFRIEND TIP: Rhinestone stickers are the best thing EVER! They stick great and you don’t need a glue gun! No mess and much faster than individually having to hot glue each rhinestone to the tail. Trust me…this is a great timesaver and definitely worth the extra money to buy the rhinestone stickers.
Step 6: PLACE TAIL INTO THE BASE & STYLE ON YOUR TABLE
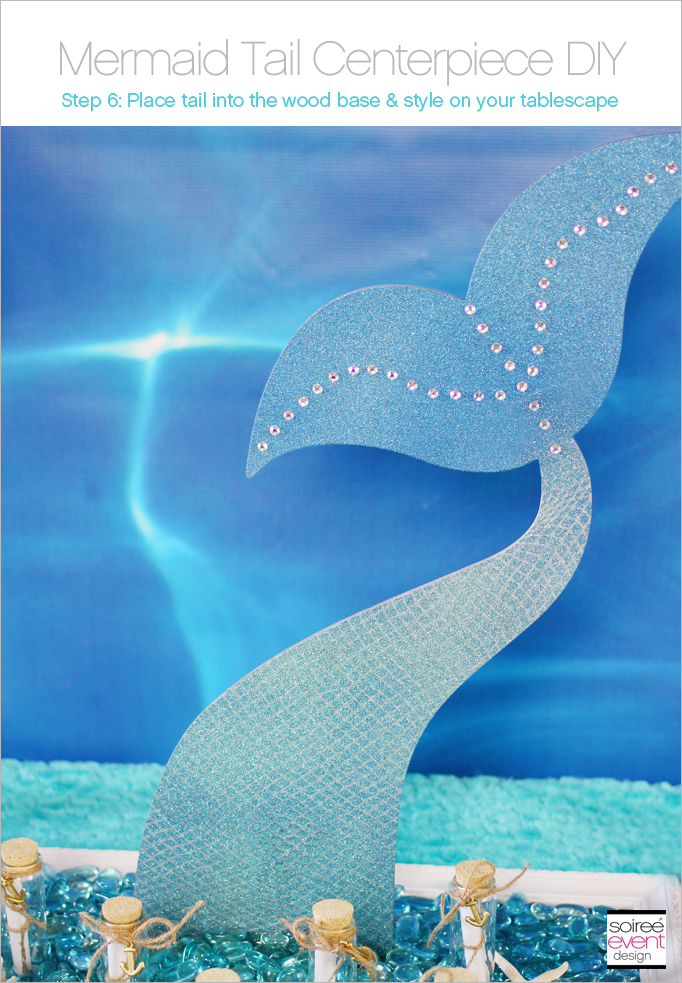
Once you’re done embellishing the tail, place it into the wood base. This is easy to do as the bottom of the tail has 2 notches that just click into the two openings on the base. All that’s left to do now is style your mermaid tail on the table. Here I place it on top of a white frame that I filled with glue gems that completely covered the base so that the tail looks like it’s coming out of sparkly blue water!
I hope this idea has inspired you to create you own Mermaid Tail Centerpiece! Be sure to check out the full Sparkle Mermaid Party on the links below:
Sparkle Mermaid Party – Part 1 Sweets Table & Photo Booth
Sparkle Mermaid Party – Part 2 Dining Table & Activities
Want to get more of my tips? Be sure to SUBSCRIBE to my blog so you can get all my blog posts delivered right to your email’s inbox so you won’t miss a thing! Subscribing is easy! Just enter your email address in the above right corner of this page and be sure to confirm your email once you get our confirmation to your inbox! That’s it!
SHOP THIS LOOK
CLICK HERE to check out my Sparkle Mermaid Pinterest board for a virtual shopping list of most of the items I used in this party’s design along with prices and links to purchase them.
Follow Soiree Event Design’s board Sparkle Mermaid on Pinterest.*****
WHERE DID SHE GET THAT?
– Styling & photography: Soiree Event Design
– Mermaid tail wood cutouts and base: Ten23 Designs
– Spraypaint and rhinestone stickers: Michaels
Cheers!
Tonya
All photos and text in this post are copyrighted to Soiree Event Design and may NOT be copied from this site and used in any way without permission from the owner. Pinning images, of course, is allowed and encouraged.
How cool!!! Thanks for sharing this awesome tutorial!
I love it! Thanks for the tip!!
You’re welcome!
what a great way to make the scales, I am not sure I would have thought of that.
Cuteness!!!! Thanks for the awesome tutorial!
Thanks Tali!
Love this. You are a spray paint master. Love the use of netting to make the details.
Thanks Sunny! LOL! I must admit…I am a “little” addicted to spray painting!
Ok this is fab, thank you! I need that glitter spray paint!
Using the netting is seriously brilliant. Love it!
That is really cute and what a treat it would be for any little girl.
What an adorable project. This is the perfect little girl’s party piece.
I probably won’t make this myself, but I do appreciate the thorough instructions. The finished product is really cool.
Fabulous tutorial! Just love this!
It’s a mermaid themed kind of day today. I love it!
What a clever way to make the tail scales! This would be one super fun party to have!
This centerpiece looks fabulous and seems fairly easy to make! Thanks for sharing the instructions!
Holy cow! That is fabulous! I would never thing of that in a million years!
Oh my goodness, can I just say that I love this? My girls love mermaids and this would be a great centerpiece at their next playdate. Thanks so much
That is beyond pretty! Totally remembering this for a future party for my little lady!
That is so pretty, you put together the most clever pieces. I wish you were here to help me with my son’s birthday.
This is adorable, very pretty. Both of my girls would love to have something like this as a centerpiece for their birthday parties.
That is so cute! I love the mermaid tail!
You come up with some of the most creative and beautiful ideas! I am loving this mermaids tail
This is just such an awesome craft idea!
This is such a cute idea and you made it seem so easy to make.
I love mermaid and sea themes for parties, will keep your blog and this centerpiece in mind for upcoming events. Keep creating wonderful things!
Tonya!! This is AWESOME!
Oh my that is so beautiful. I’m not sure if I try it if it’ll look even remotely like yours but I so love it.
How cute is this?? It’s is perfect for mermaid parties!!
That is such an awesome idea for making a mermaid centre piece and really quite simple. Thank you
That is the cutest centerpiece I have seen in a long time. Thanks for breaking down the steps. I’m going to have to give it a try.
You make this look so easy! My two girls love mermaids and I’m sure would love this centerpiece for a birthday or a party.
What a fun decoration. These would be great to decorate a pool.
This is such a genius idea! When I was little, mermaids were my absolute favorite, and I wish I could have had a birthday party like this. So cute!
Woah! That was awesome and so artistic! I love the outcome it looks so nice!
I am obsessing with mermaid designs. Omg i love your tutorial!
Oh that’s kinda cool! Hope to try it one of these days.
This is such a cute theme! My daughter is totally into mermaids right now, so she would love it!
This looks so beautiful and very effective as a table centrepiece.
I love the toil you have here. You’re really good at that spray paint. I had no idea they even offered and glitter in spray paint. This would be a fun party to do for my niece.
What a fun craft project! I love working with spray paint. It’s beautiful and the in-depth tutorial is really helpful.
That looks so amazing! Thanks for sharing this tutorial. You did a fantastic job.
I love your “girlfriend tips”. This is a super cute idea and I can’t wait to show this to my 4 year old daughter. Maybe (fingers crossed) she’ll want to have a mermaid birthday party this summer.
Really very creative, would love to replicate someday!
It turned out really great!
Oh this is perfect! such a great DIY! Are you making mermaid cupcakes next? 😉 xx corinne
My niece’s birthday is coming up and she loooves mermaids this would be a great way to decorate for the party
This doesn’t look hard at all! What a cute DIY for a girl’s party!
This is so beautiful. I’m a huge fan of mermaids and the Little Mermaid and I would love a centerpiece like this. It makes me think I need to have a mermaid party.
I’m an adult, but my inner child makes me want to try this. HAHA Looks like so much fun!
What a lovely, creative centerpiece. Your designs always amaze me. Keep it up!
Cool! Any little girl (or a little girl at heart) would fall in love with this centerpiece. It is not difficult to make. We’ll see if my daughter would want this theme for her next birthday party
This is such an amazing idea! I know a few people planning mermaid parties this summer- I think they’d love it!
I have to send the link to this post to my cousin. Her daughter’s birthday is coming up soon and she’ may want to use this for a party theme. The mermaid tail looks awesome!!
This will be a perfect centerpiece for my treat table. My Daughter is having a Mermaid themed party this summer.I hope mine turns out as nice as yours did.
I am in love with this centerpiece. I will have to share this with my friend who is planning a party for her little girl.
i love this for a summer party. And you really show us how to do it really easily.
I need to make this with my daughter. She’d just want one to have in her room!
Perfect Summers Party Idea !! for Girls !! you Done things with so much perfection !! Hats off
Tonya, I’ve been seeing photos from this party decor on your IG and let me tell you this isn’t DIY, this is professional!!! OMG, I thought it was all bought, never have imagined this tail was DIY. You are so skilled!
AWW, Thanks Laura!
You always have the coolest party ideas. My girls would love this!
This is super cool. I need to make it this weekend.
I love rhinestone stickers too, but I’m super impressed you got them to stay on a glitter surface. I made a robot a few year back and was not as lucky- though they stuck for a little while.
This is such an adorable DIY project! I cant wait to share with all my mermaid lover friends!! Xx- Doran @HauteBeautyGuide
Very creative and cute. If we had girls I am sure we would be making this .
These are so cute! They are so on trend and are super easy to make. thank you for the tutorial, it was really usualful.
prettyfitfoodie.com
This is so creative and so pretty! Bet it will make a lot of little ones really happy on their special day!
This is brilliant! Thanks for sharing, probably have a try with my little one 🙂
It was really creative of you to use that net for the scales! I think it’s awesome and it’s definitely a lovely centerpiece.
This is so cool. The mermaid tale came out great!
Wow, what a cute themed and I’m sure my daughter would love this too. Everything looks Beautiful
This looks so pretty and I loved the neatness in everything. Mermaid used to be daughters favourite but they are grown up now. Thanks for the steps to make it.
Ooo I like how you showed step-by-step and I really like the “netting” idea. I probably wouldn’t have thought of that and instead, tried to draw lines across! That’s really pretty though, I love the sparkles 🙂 http://www.clairebearblogs.com
I love DIY things and this one is lovely! Can’t wait to make it one day for my kids 🙂 (hope I get some girls haha)
This is such a creative idea and the finished product turned out so nicely. Great idea for a kids party too!
Cheers, Sarah Camille // SCsScoop.com
My daughter would love this. She is into mermaids. I will have to help her make a smaller version.
My goodness, you’re so talented I would have never thought making it myself.
What a fun DIY project! Everyone needs a little mermaid in their life
Woah, what a cool decoration! I love how simple it is to make and how you give us such easy, step-by-step instructions!
Oh how cute! I love how you used the fishnet stockings to create the fish scale pattern in the tail! I would have NEVER considered this idea!!!
Perfect decoration for any little mermaid party. My nieces birthday is coming up! Thanks for this!
This is the cutest decoration idea! It’s so creative.
i really like how everything turned out. My friend recently celebrated a mermaid theme party for her daughter. This would’ve definitely came in handy.
Wow. That’s taking creativity to a higher level. Good job.
wow, this is such a great idea for a mermaid themed party. Thank you for sharing
This is super cute! You’re always so crafty! I love some of the ideas that you come up with! This would be great for a party idea for my niece who LOVES mermaids!
This is such a cool tips. Love it.
This is so cool. Would never have thought of using fishnet stockings!
OMG!!! I must bookmark this post and rush to visit my Niece. She would totally love doing together…she is kinda obsessed with The Little Mermaid. So this would be perfect.
Yay! Glad to provide some inspiration for your niece!
Wonderful!! Such a nice idea. So cool and great! Very creative. I love it
very creative! I’ll show this to my daughter, she’s into this kind of art!
The mermaid tail looks gorgeous! I forgot that we have awesome spray paint colors now. lol