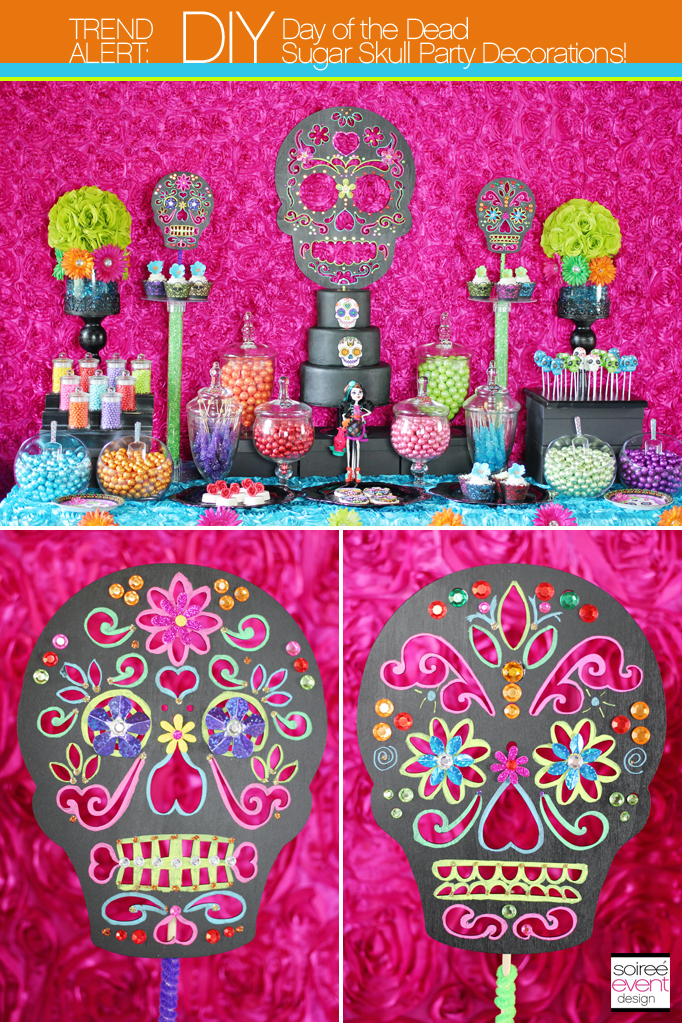
Hey party peeps! Day of the Dead parties are so hot right now! They are everywhere and today I’m going to share with you my tutorial for creating your own Custom Day of the Dead Sugar Skulls Party Decorations made from laser wood cutouts.
At the forefront of this trend is Ten23 Designs who custom cuts from wood any image you want from 2″ to as large as 22″ like this Sugar Skull I used as a wow-factor backdrop for my Day of Dead Candy Buffet.
Check out more of my Day of the Dead party designs:
– Day of the Dead Dining Table
– Day of the Dead Candy Bar
– Day of the Dead Party Activity
– Day of the Dead Photo Booth
HOW DID SHE DO THAT?
Creating these custom sugar skulls is easy with my 5-Step DIY Plan!
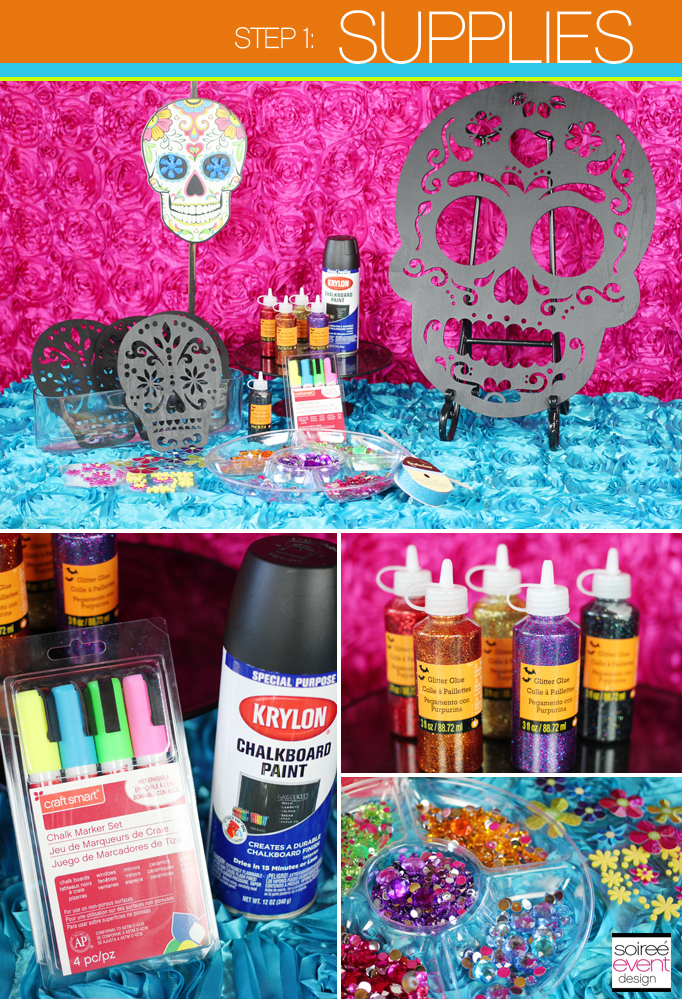
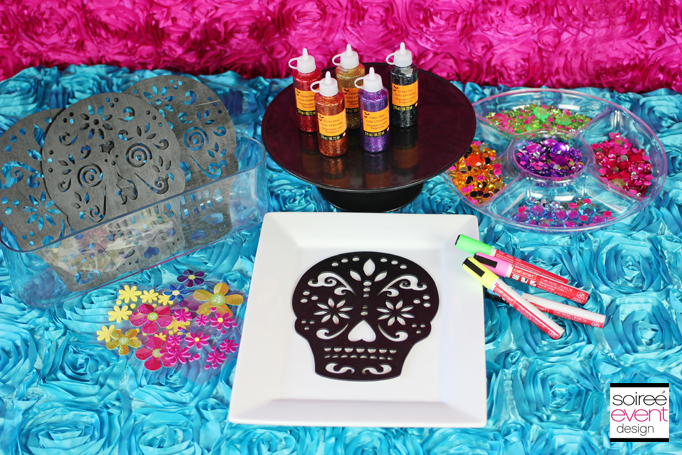
Step 1: Get Your Supplies
First order your 22″ custom laser wood cut sugar skull from Ten23 Designs. It will come delivered to you unfinished and ready for you to paint and customize to match your party decor perfectly. Next, you’ll need to get the rest of your supplies. I went to my go-to craft supply store— Michaels— to gather all the craft supplies needed to customize my sugar skull:
– 1 can of chalkboard spray paint
– 1 pack of chalk markers (fluorescent colors)
– tubes of colorful glitter glue
– 1 pack of flat backed colorful rhinestones
– 1 box of Glue-Dots®
– assorted flower and rhinestone stickers
GIRLFRIEND TIP: While shopping in Michaels I came across these small 8″ wood cut sugar skulls that I thought would be great to have guests decorate as a party activity and to use as decor on my candy table flanking the large main sugar skull. Michaels has lots of Day of the Dead decor this year, so if you’re planning on a Day of the Dead party, be sure to check them out.
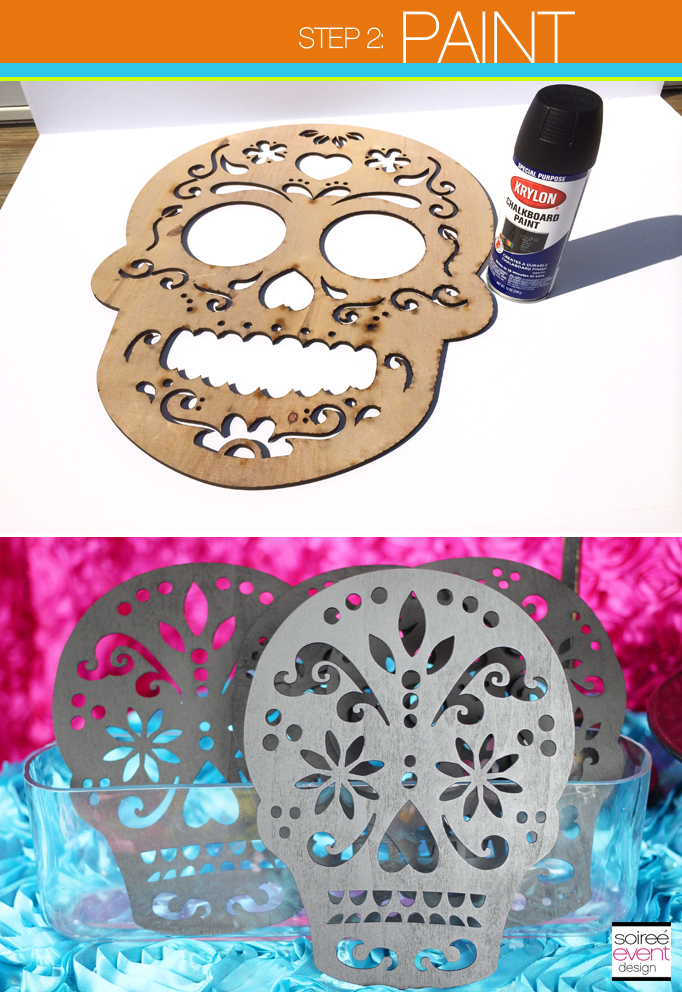
Step 2: Paint the Wood Cuts
Spray paint your wood cut sugar skulls outside or in a very well ventilated area (like an open garage) to coat evenly. You will need to use two coats to get a really good chalkboard finish. Let them dry completely.
GIRLFRIEND TIP: I wanted to make the skulls black, so I decided to use Chalkboard spray paint as a base so that I could use these bright chalk markers on top to get that bright vivid color I was after.
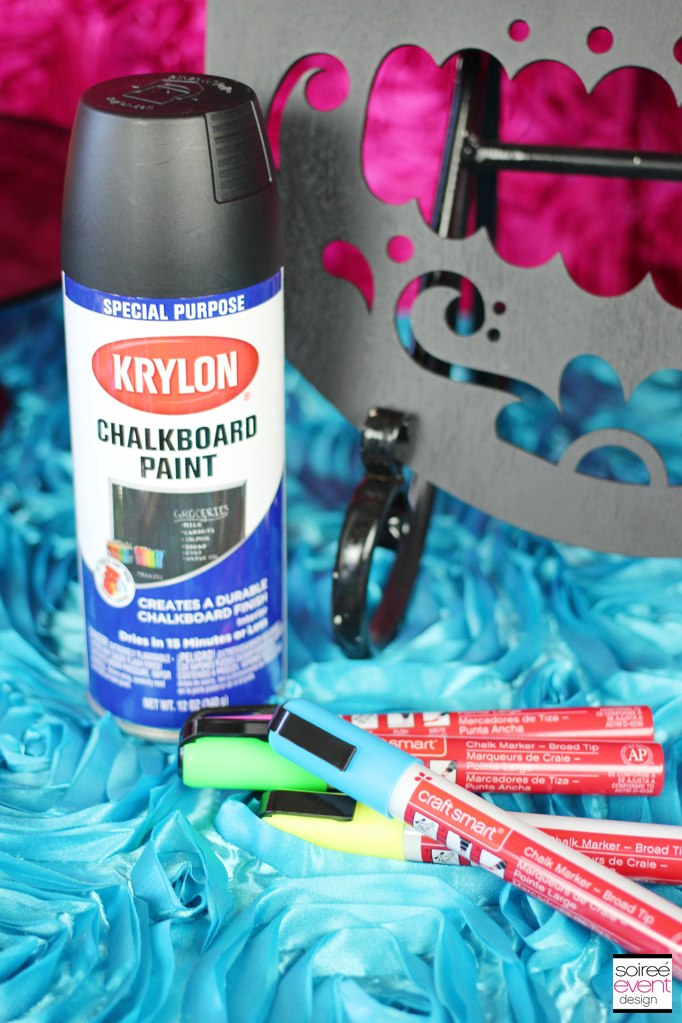
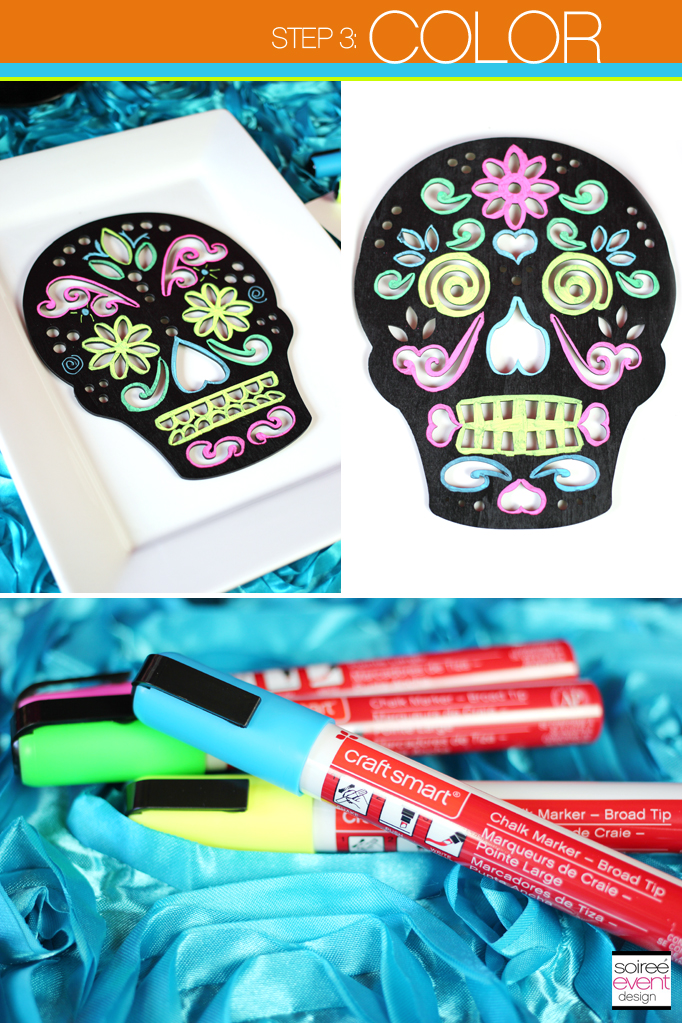
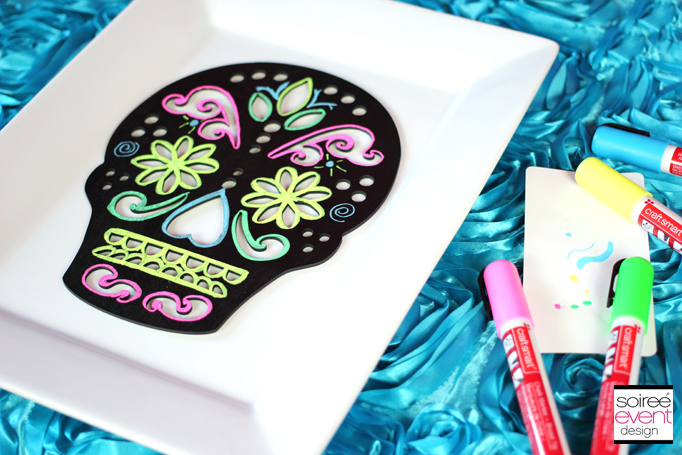
Step 3: Color Your Sugar Skulls
Using the chalkboard markers, outline all the open areas of the wood cut. This really brings out all the shapes and cool patterns that make sugar skulls so cool! Be sure to let your sugar skull dry completely before moving to step 3.
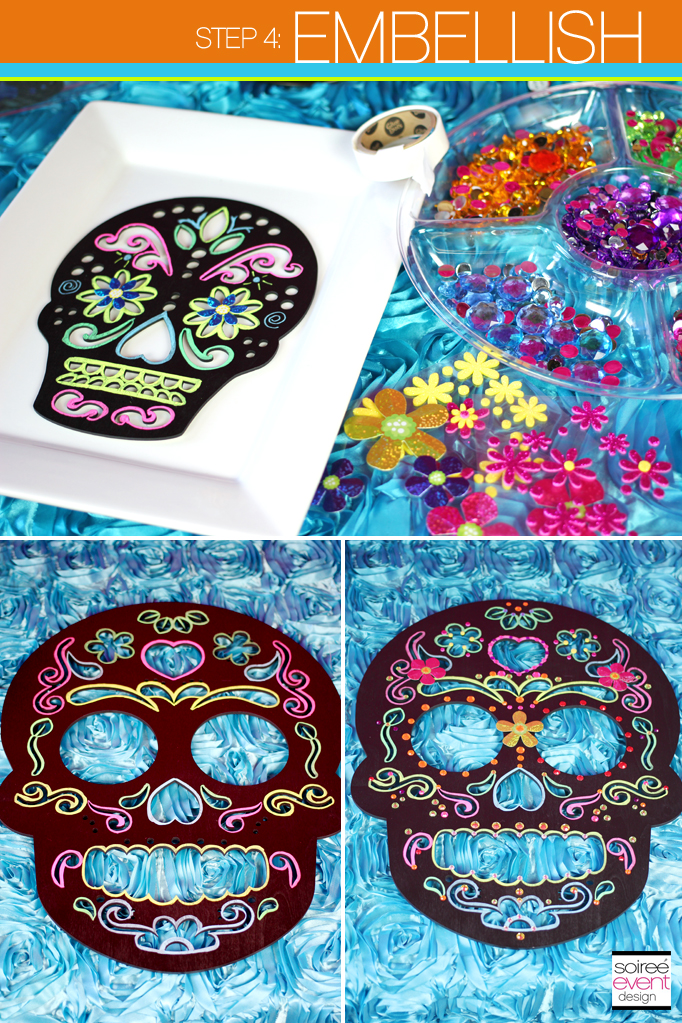
Step 4: Embellish Your Sugar Skulls
This is where the magic happens! Using the rhinestones and stickers, embellish your sugar skull any way you want. Be creative! Use the glue dots to place the flat-backed rhinestones over the cut out holes.
GIRLFRIEND TIP: Be sure to use a slightly larger rhinestone over any of the cut out holes so they won’t fall through.
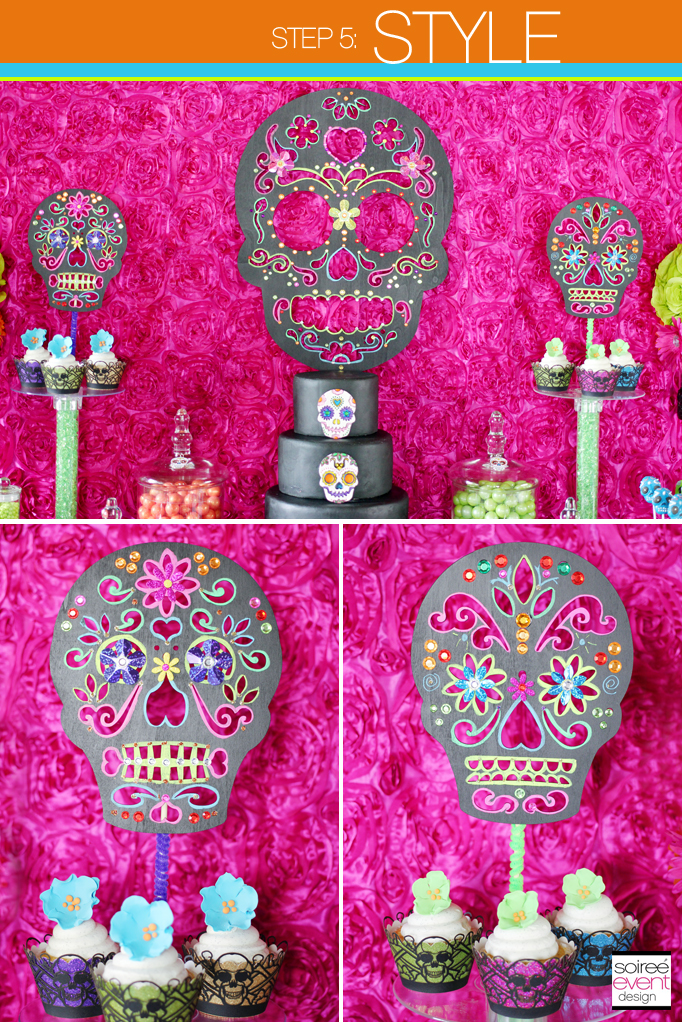
Step 5: Style Your Sugar Skulls in Your Party Decor
Now that you’re done creating your custom sugar skull decorations, now it’s time to style them in your party’s decor. I used the larger sugar skull as the main backdrop to my Day of the Dead Candy Buffet table. The two smaller ones I hot glued to a wooden dowel and used them as centerpiece sticks in the tops of my cupcake tower displays.
GIRLFRIEND TIP: As a fun party activity, set out some smaller sugar skull wood cutouts and embellishments and watch as your guests have fun designing their own. Be sure to spray paint all the cutouts a few days before your party.
CLICK HERE TO SEE THE FULL DAY OF THE DEAD CANDY BAR!
Want to get more of my tips? Be sure to SUBSCRIBE to my blogso you can get all my blog posts delivered right to your email’s inbox so you won’t miss a thing! Subscribing is easy! Just enter your email address in the above right corner of this page and be sure to confirm your email once you get our confirmation to your inbox! That’s it!
WANT MORE HALLOWEEN PARTY IDEAS?
Click the links below to see lots more of my Halloween Party Ideas
– DIY Day of the Dead Glasses and Tray Set
– How to Make Ghost Pops!
– Boo Bunch Kid Friendly Halloween Party
– DIY Frankenstein Pedestals
– DIY Pumpkin Pedestals 3 Ways!
– Vintage Spider Halloween Dinner Party Table
– Black Widow Spider Halloween Dinner Party Table
– Bling Spider Halloween Dinner Party Table
– “WitchCRAFT” Halloween Kids Party
– Kid-Friendly Boo Bunch Monster Halloween Party
– “Twilight Fairy’s Hollow” Halloween Kids Party
– “Trick-or-Treat Street” Halloween Kids Party Candy Table
– “Haunted Farmhouse” Adult Halloween Party Dessert Table
– “Spooky Lab” Science Halloween Kids Party
– Day of the Dead Halloween Party
– DIY Day of the Dead Halloween Wreath
– DIY Day of the Dead Headband
– Day of the Dead Halloween Party Candy Table
– Day of the Dead Halloween Party Photo Booth
– DIY Day of the Dead Sugar Skull Party Decorations
– DIY Sparkly Spider Wreath
– Vampire Chocolate Cherry Cupcakes Recipe
– PEANUTS® Great Pumpkin Charlie Brown Halloween Kids Party
– Ghost Pop Recipe
– “Bitten” Snow White Witch’s Lair
– Gold & Plaid Halloween Glam Dinner Party
– Monster High Party “Ghouls RULE” Party
– Monster High Halloween Party “Ghoul Glam”
SHOP THIS LOOK
CLICK HERE to check out my Day of the Dead Pinterest board for a virtual shopping list of most of the items I used in this party’s design along with prices and links to purchase them.
Follow Soiree Event Design’s board Day of the dead party on Pinterest.
WHERE DID SHE GET THAT?
– Styling & photography: Soiree Event Design
– Large sugar skull custom wood cutout: Ten23 Designs
– small wood skull cutouts, wood dowels, rhinestones, stickers, chalk markers, spray paint, glitter glue and Glue Dots: Michaels
– Monster High Skelita Calaveras doll: Target
– Monster High Skelita Calaveras costume: Party City
All photos and text in this post are copyrighted to Soiree Event Design and may NOT be copied from this site and used in any way without permission from the owner. Pinning images, of course, is allowed and encouraged.
You are so creative. I am loving all of your sugar skull creations!!
Okay, these are absolutely amazing! I love Sugar Skulls and have considered getting a tattoo of one, this is such an awesome idea! I think I might need to make a run to the craft store soon to play 😉
Smart thinking with the chalk markers on the chalkboard. The colors really pop!
Great tutorial! These are amazing!
Love all of the Sugar Skulls. The colors really stand out.
You are so creative, this is not a scary halloween party but so much more.
How pretty are those! You did an awesome job and I love the easy directions with big pictures!
Gorgeous! The colors are stunning, and you make it all look so easy!
Love those bright colors! Looks like fun!
These Day of the Dead skulls are so awesome!! I totally want some.
What a fun activity for a party. Great ideas!
Wow so amazing! You did an incredible job, love the colors!
These sugar skulls look great! I love the black you use for the base. The color really popped on that background.
Such a great idea for October! My kids will love decorating these 🙂
These are so wonderful, so creative, so funky! We will definitely be trying these out this year.
I love the idea of using the paint and pens to make them unique! Great work.
I love that the sugar skulls decor can be DIY’d. My sister is really into this type of stuff!
Wow! You did such an awesome job with these. I just might try it myself as well.
These are absolutely great! I know my daughter would have a blast making these!
Oh what total fun… this makes me want to go out to purchase the markers to do this with my kids. Thanks for sharing
Those are so cute and detailed. I can’t believe how easy they were to put together.
Great tutorial. Love the colors.
Seriously, these diy skulls are spectacular! Love!
I love that you have given a tutorial for this. As I have not a creative bone in my body, I can at least duplicate yours! 🙂
These look amazing and I absolutely love the colors used! I love the whole sugar skull theme, would be perfect for a halloween party.
Those skulls are crazy beautiful! What creativity!
These are perfect decorations for The Day of the Dead. I love the chalkboard paint and the chalk markers. I would love to try making these.
Guuuurl… YOU are the crafty genius! I LOVE this! ALL of this!!
these are awesome! I love step by step photo tutorials! Would love to see some youtube videos from you!
You gave good directions that can be used on a variety of projects.
Super clever!!!
I love the colors of this!! So much fun!
Love the creativity sugar skulls lend themselves to! Good call on the Micheal’s pre-mades–have to go hunt those down!
This is really awesome! Everything about the decorations I love, especially the colors!
beautiful designs. I wanted to let you know I found your exact design on the Micheals.com website. I googled “michaels craft wooden skull” and it was the first one that popped up. I wanted to let you know because they didn’t site your work
I actually got the wooden skulls from Michaels. Then I embellished and painted them as you see in my post. Glad you like them!