This is a sponsored conversation written by me on behalf of Cricut. The opinions and text are all mine. #PartyWithCricut #CricutMade #Cricut #ad
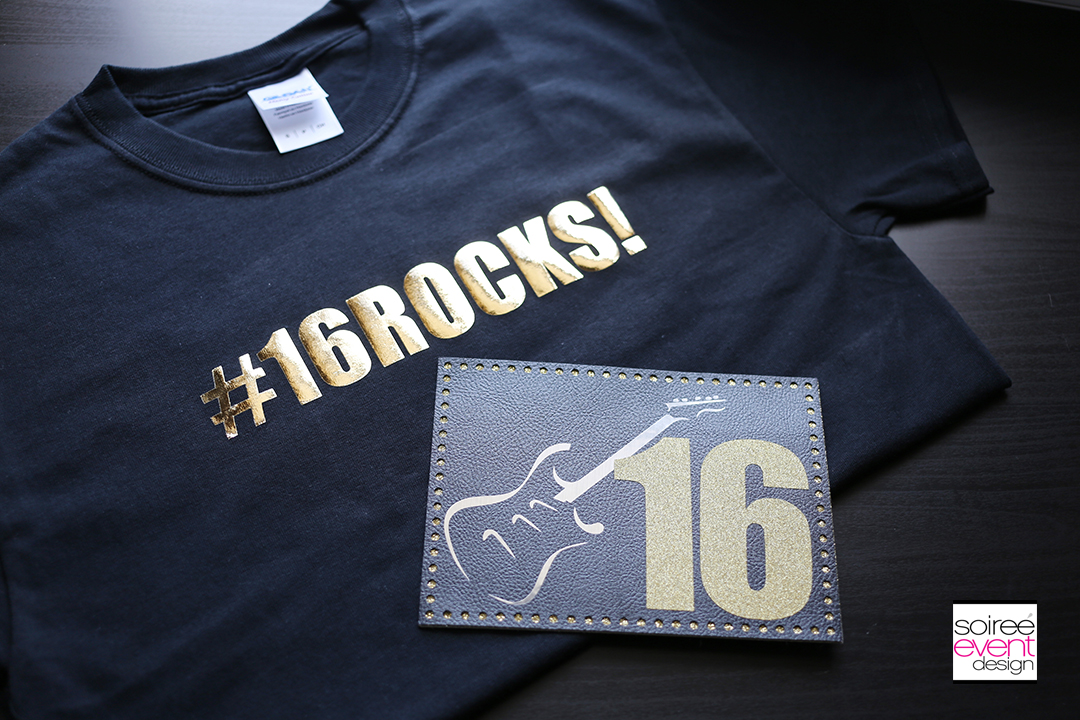
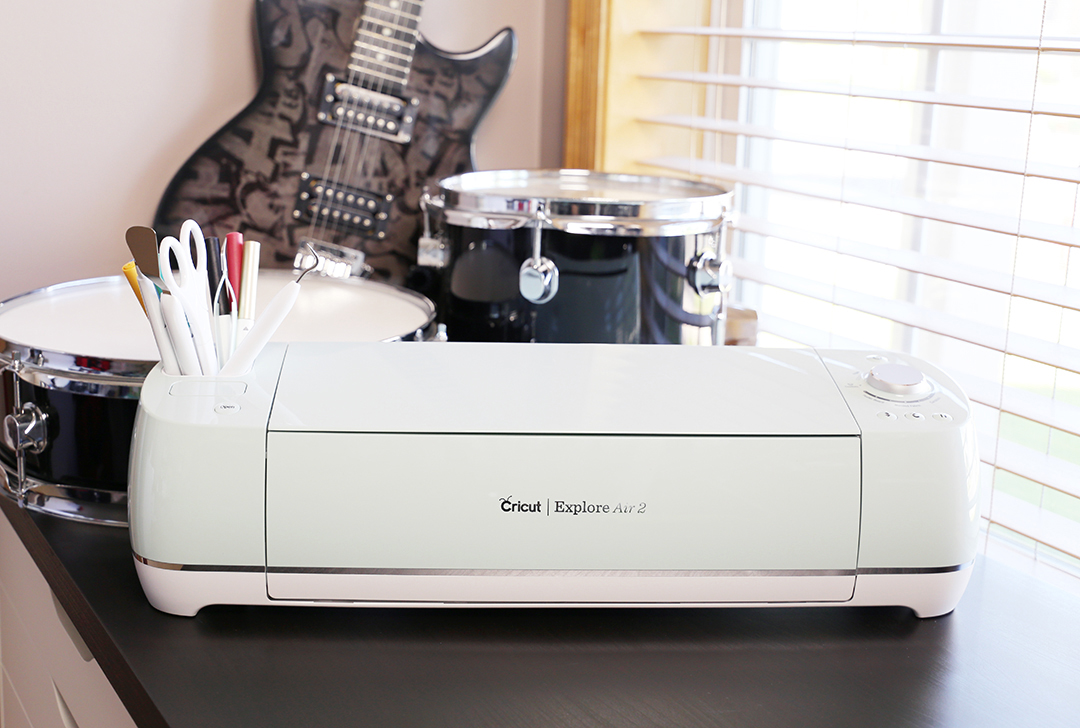
Hey party peeps! Last week I shared my ideas for a Sweet 16 party and how to make the Sweet 16 Invitation (see it HERE). Today, I’m going to show you how to make this #16ROCKS! SWEET 16 T-SHIRTS with my new Cricut Explore Air™ 2 machine.
LET’S MAKE THESE DIY SWEET 16 T-SHIRTS!
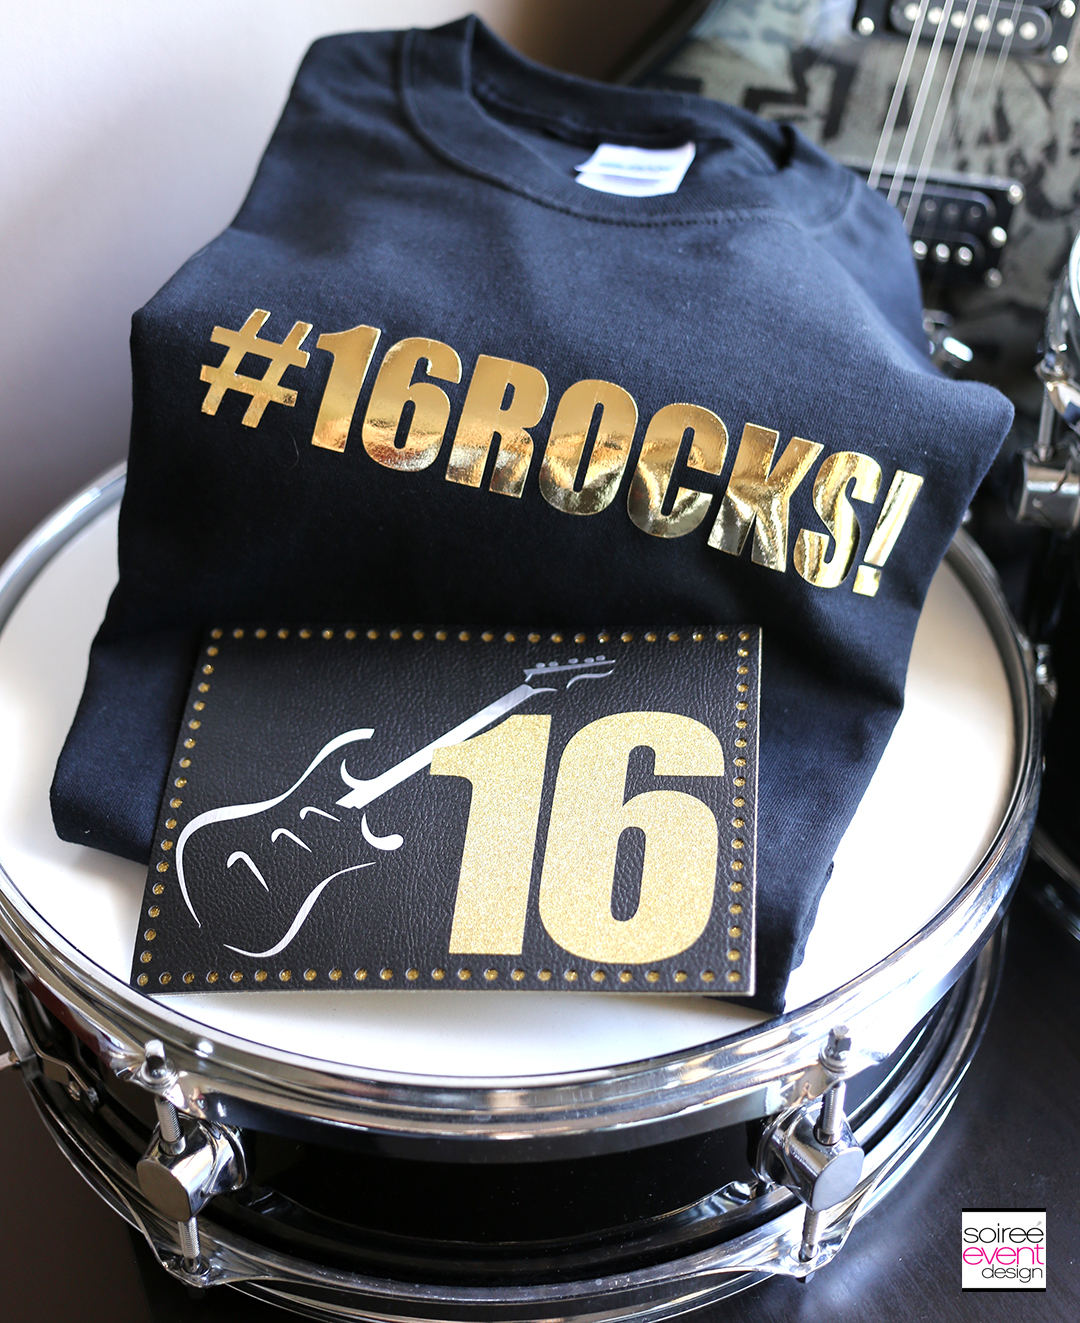
These would make fabulous Sweet 16 party favors or you could package them up with your Sweet 16 party invitation like I did and really make your guests feel like V.I.P.s! Have your guests wear the custom t-shirts to the party. How fabulous is that!
HERE’S WHAT YOU’LL NEED
Here’s a list of what you’ll need to make this T-shirt:
– black t-shirt
– Cricut™ Foil Iron On (gold)
– Cricut™ Tools (weeder, paper trimmer)
– iron
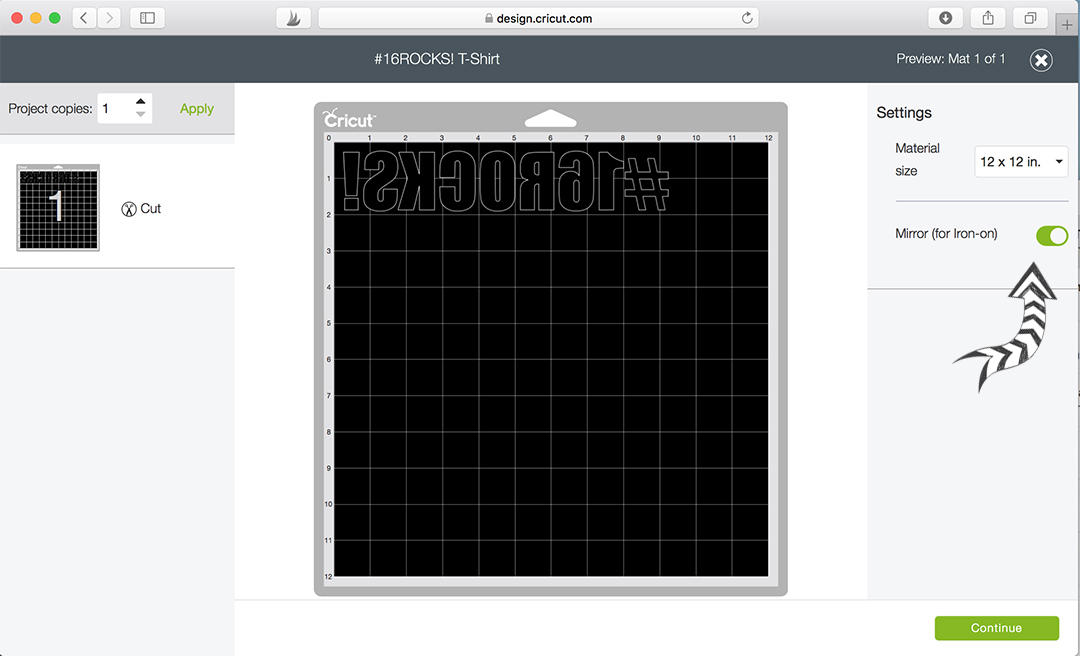
STEP 1: LOAD THE T-SHIRT PROJECT IN CRICUT DESIGN SPACE
Log in to Cricut Design Space. You can access this #16ROCKS! T-Shirt Project file directly HERE. Click on OPEN. You will see the T-Shirt project loaded on your canvas that resembles the Cricut mat. Cricut Design Space will automatically walk you through cutting. Your computer can connect to your Cricut wirelessly via Bluetooth or you can connect directly with a USB cord. Once you have the project open, CLICK ON MAKE IT.

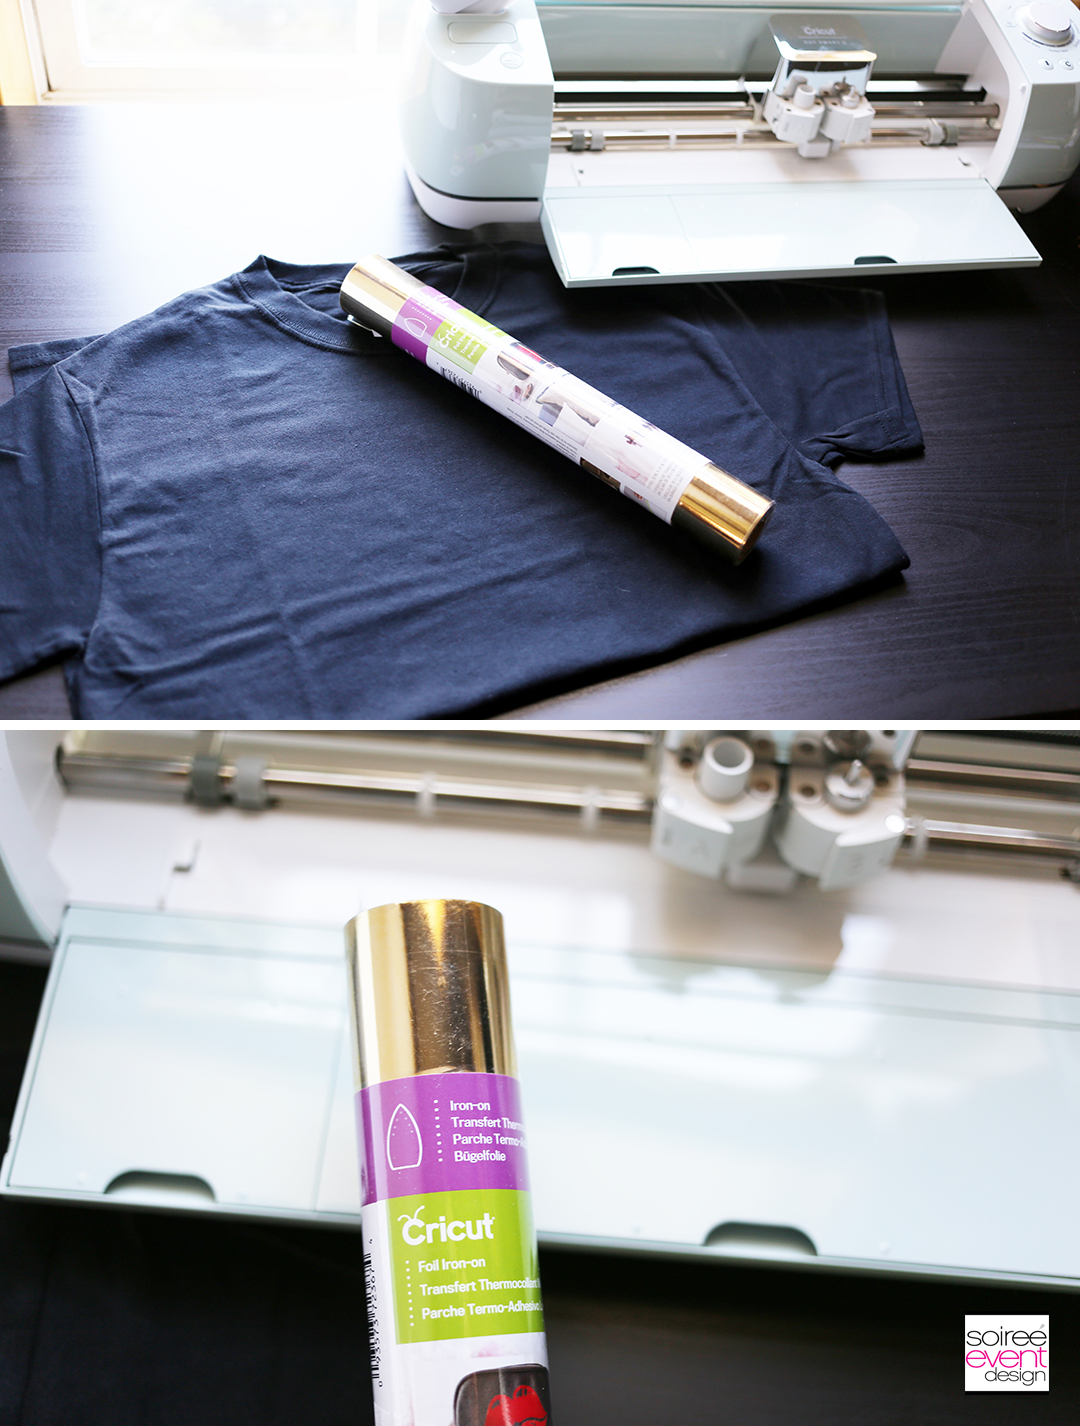
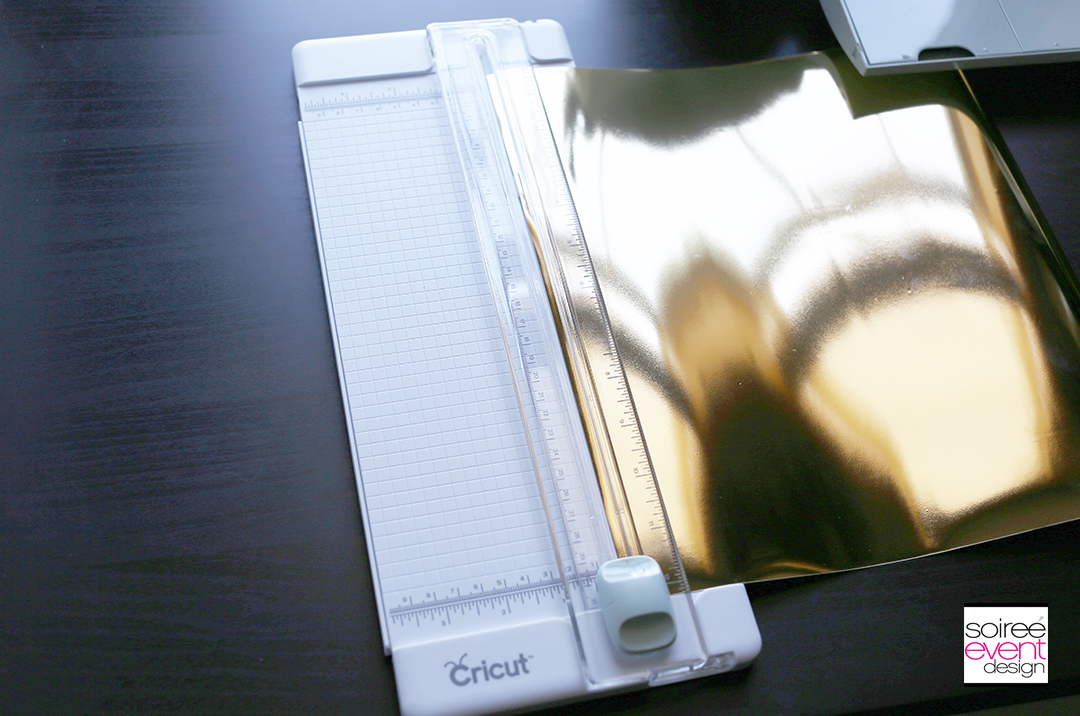
STEP 2: PLACE THE IRON-ON FOIL ON THE CRICUT MAT
Trim a 12″ piece of the Iron On Adhesive Foil with the paper trimmer. Starting at the top left corner of the mat, place the gold adhesive foil on your Cricut standard grip mat with the gold side face down on the mat. Smooth it down so it is flat on the mat.
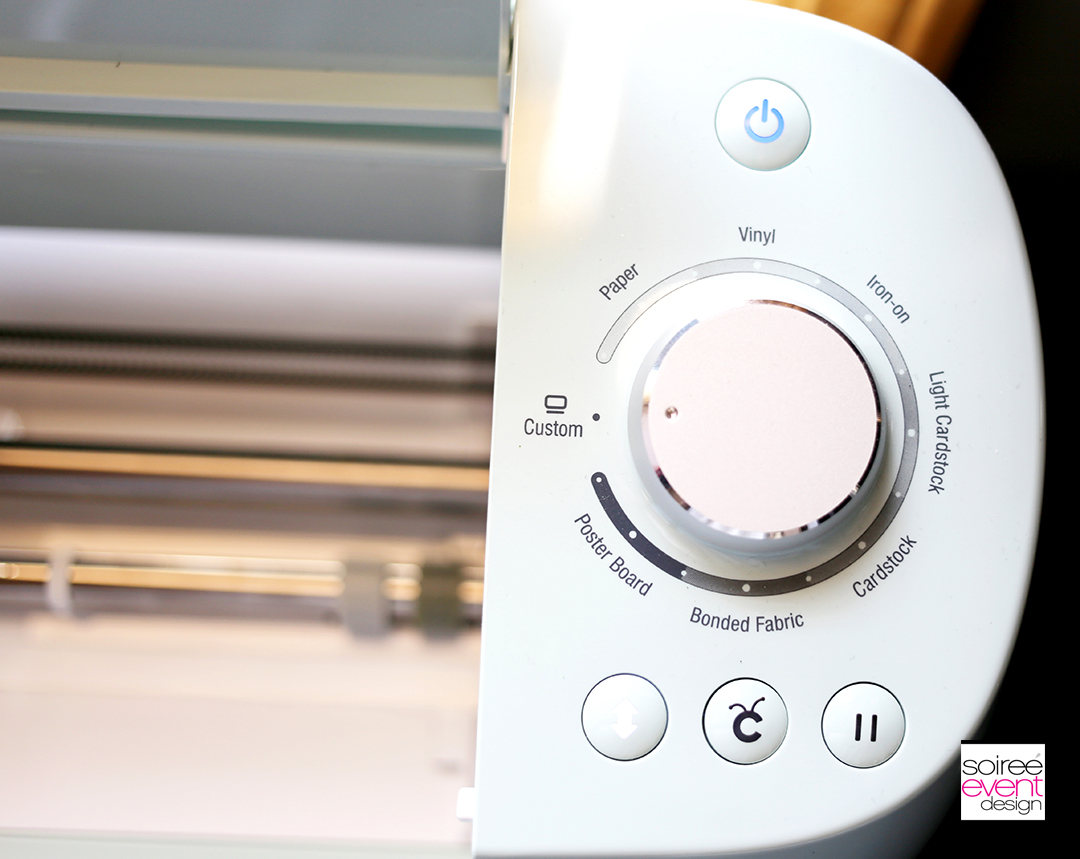
STEP 3: LOAD THE GOLD FOIL IRON-ON INTO THE CRICUT
Turn the material knob on your Cricut to CUSTOM and select Iron On Foil from the list of custom material options. Be sure to select the “MIRROR” option in Design Space so it cuts out the image backward on the iron on material. When prompted, place the mat under the clips on the Cricut and hit the LOAD button on the front of the Cricut. It will pull the mat into position.
STEP 4: CUT OUT THE WORDS FROM GOLD FOIL IRON ON
When prompted, hit GO! The Cricut will cut out the words from the iron on foil. When it’s done you will hit the LOAD button again to unload the mat. Once unloaded, gently pull the foil off the mat leaving the words image on the mat. Use the weeder tool to remove any unwanted foil left on the mat, like the inside of the number 6 and inside the #.


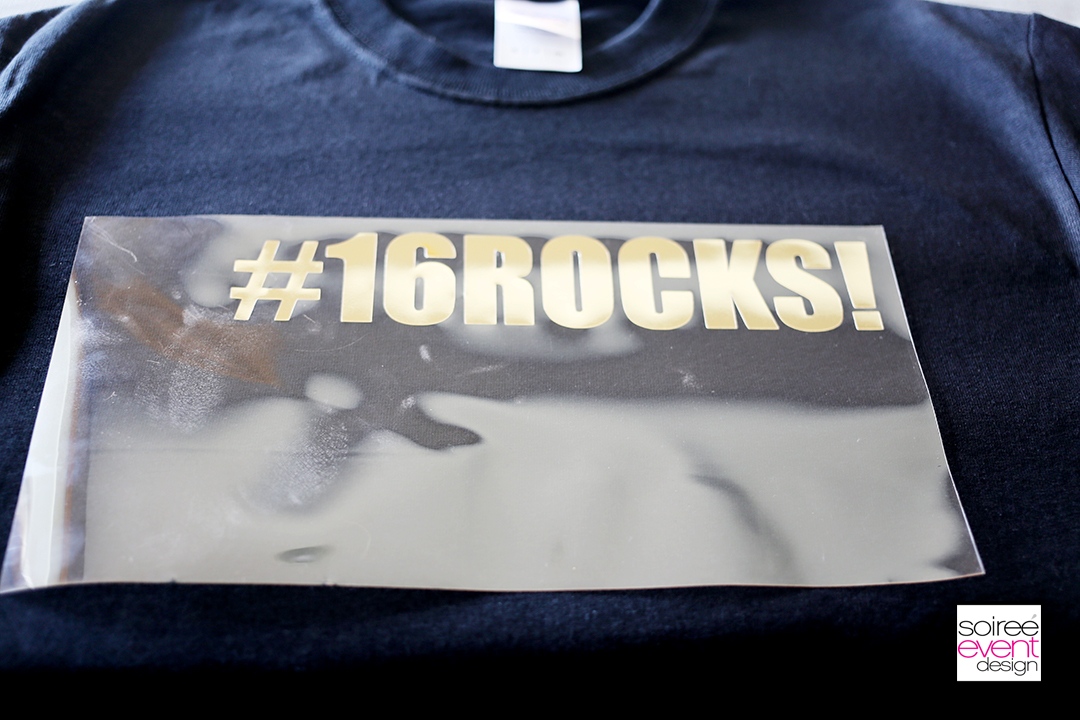
STEP 5: IRON ON YOUR DESIGN TO THE T-SHIRT
Next, it’s time to iron on your #16ROCKS! design on to your black t-shirt. Start by ironing the t-shirt free of wrinkles. Then, place your iron on the lowest setting (wool) and turn off the steam. Iron the front chest area where you will be putting your design for a minute or so to heat it up. Remove the iron and place your design on the shirt where you want it.
Place your iron on top of the liner and pressing firmly, iron the entire design area for 3-4 minutes. Then turn the shirt over and iron the backside of the iron on for another few minutes.
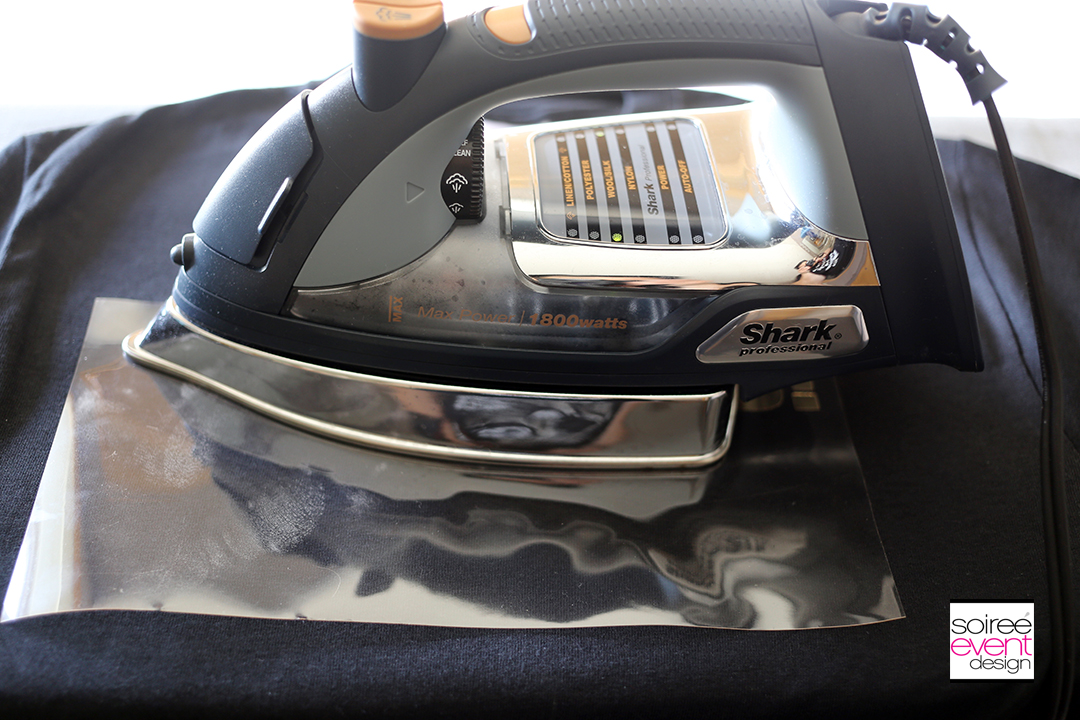
Let cool then lift the liner away from the shirt leaving the gold iron on foil on the shirt.
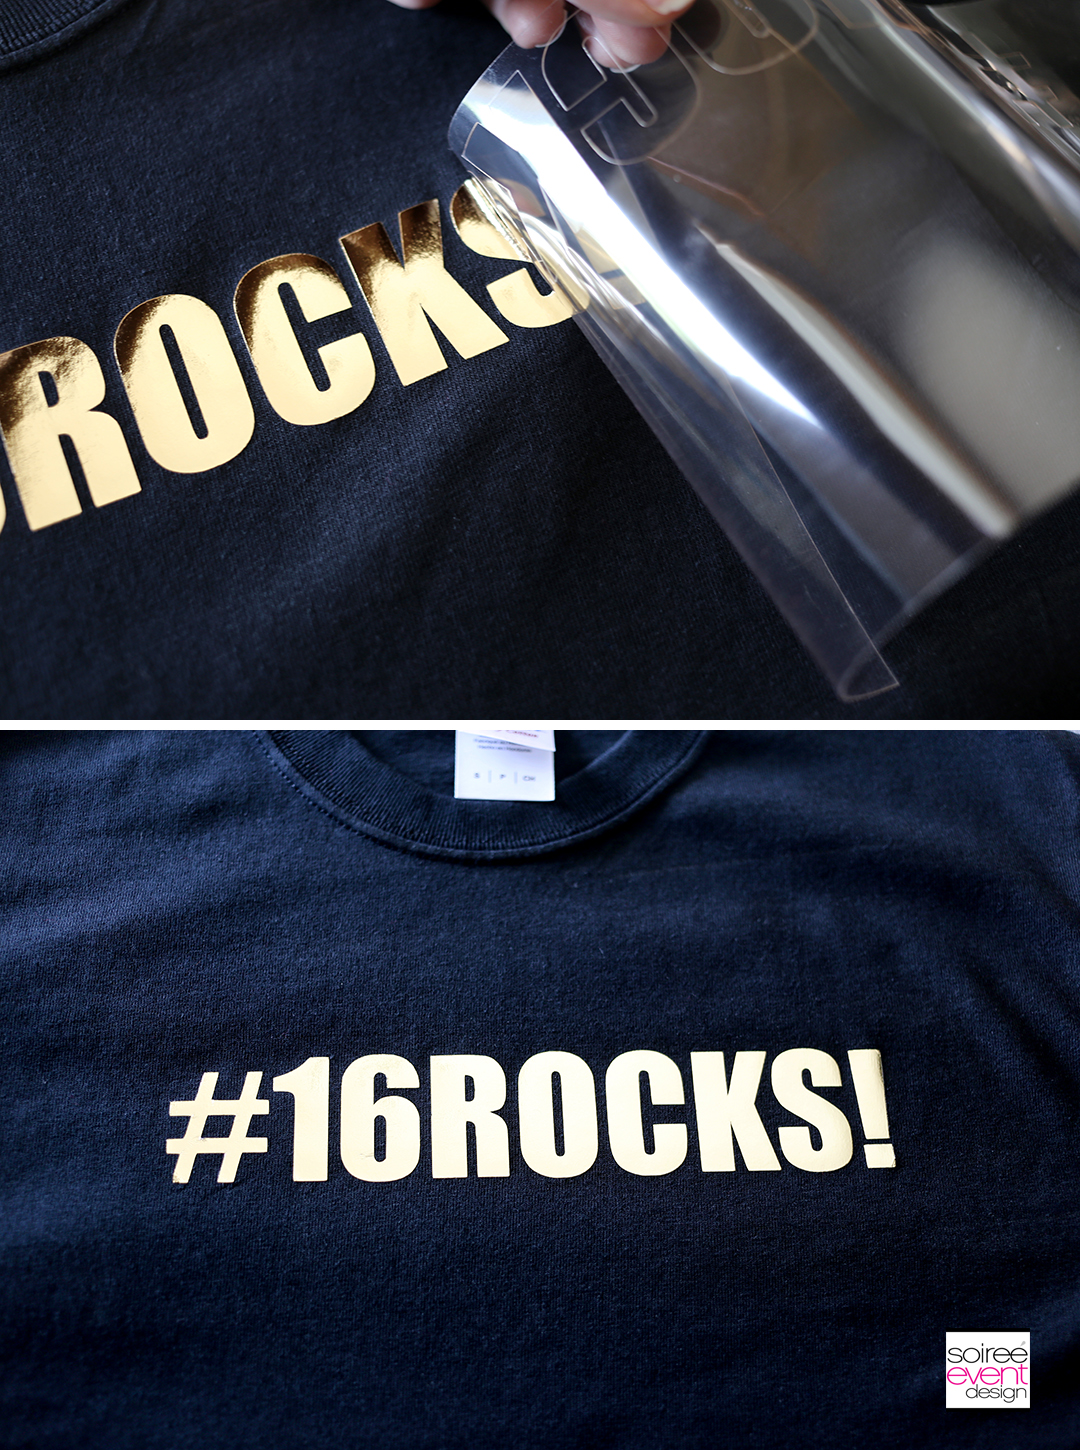
That’s it! Looks awesome, right? Your #16ROCKS! t-shirt is done. What a great gift idea or even party favor for a Sweet 16 party.

Make your friends feel like VIPs and package this t-shirt with these matching invitations. CLICK HERE to see how to make the invites.
I don’t know about you, but my new Cricut Explore Air™ 2 Machine has opened up all kinds of creative possibilities! I’m going to be making lots of t-shirts this summer with this easy tool. If you don’t have one yet, I have GREAT NEWS!

ENTER TO WIN A CRICUT!
Me and my fellow party bloggers have teamed up to give away a Cricut to one lucky winner! Enter now below for your chance to win! Enter to win your very own Cricut Explore Air 2 machine HERE
WANT MORE DETAILS ON THE CRICUT EXPLORE AIR™ 2?
If you don’t own a Cricut Explore Air™ 2 machine and are looking for more information or are considering getting one for yourself, CLICK HERE for more information. You can thank me later!
LOOKING FOR MORE IDEAS? FOLLOW ME ON PINTEREST FOR LOTS OF INSPIRATION!
CLICK HERE to check out my PINTEREST BOARD full of recipes, parties, home decor, DIY projects and more!
DON’T MISS A THING!
Be sure to SUBSCRIBE to my blog so you can get all my blog posts delivered right to your email’s inbox so you won’t miss a thing! Subscribing is easy! Just enter your email address in the above right corner of this page and be sure to confirm your email once you get our confirmation to your inbox! That’s it! AND…you’ll get a code for 10% off your next order in our shop. YUP…GOTTA LOVE THAT!
WANT TO SEE MORE OF MY CRICUT PROJECTS & POSTS?
Click on any of the projects & posts below:
– Check out the NEW Cricut Explore Air™ 2 and up your DIY game!
– My First Project with the new Cricut Explore Air™ 2
– Make Custom Party Plates with the new Cricut Explore Air™ 2
– Make DIY Sweet 16 Party Invitations with Cricut™
– 4th of July Superhero Flag Shield Backpack and Water Bottle with Cricut
– How to Make Your Own Personalized Unicorn Party Plates with Cricut
Cheers!
Tonya
I was invited to participate in the Cricut Party Blogger Program Kickoff.
This experience is based strictly on my opinion. Others may have a different opinion or experience with the product listed above. I was provided the sample free of charge by the company or PR agency and I have given my honest opinion.
This is a sponsored conversation written by me on behalf of Cricut. The opinions and text are all mine.
This is so cute! I cannot believe how many amazing things the circuit can make. I definitely need to get one.
Clever! When I saw the first picture I assumed these were purchased like that and had no idea you could DIY such an awesome shirt!
What I great idea!Wish I would had that too wehn I was 16
Wow this is really cool I need one now my kids would love to do this, me as well
Woah! That was awesome idea and very unique! Will surely gonna try this idea too!
Say what! I was impressed with the cards and the stickers and now I’m even more at awe because you can design shirts! This printer is a must have!
This is so cool! I can’t believe how easy it is to make your own t-shirts. These are definitely a great gift idea or party favour.
I need to get a circuit. They do so many cool things!
I need to plan purchasing that. It looks so amazing all my guest would be wearing the same t-shirt as i do.
I really love this theme for a 16th birthday party! Of course I need to get me a Cricut!
That’s so cool that you can cut that stuff out on the circuit and put it on the T-shirts. I didn’t realize that you could do that. I will have to check into getting one of these amazing machines. I have seen them at work, but this is just so cool
Its amazing what you can do with a Cricut. The shirt turned out beautiful, and the invitations look like it was done in a printing press. Nice!
This is a really great in-depth tutorial! I’ll have to create a shirt once I get my hands on a cricut!
The tshirt looks so cool! I am not that creative but I would love to learn to do stuff like that. All these awesome things you can do with a Cricut!
That tshirt looks pretty darn amazing. Great job! Wow! I’m impressed. From that little machine? I entered to win one. I need one in my life.
Such a great idea! DIY is amazing and I love to custom my clothes! This tool looks amazing! xx corinne
One of these days, I will be that good with it! I’m still learning.
That is awesome! I would love to win one of the Cricuts so I can make stuff like this.
These shirts are adorable! I really love that gold foil and this looks a lot easier than I thought! Thanks for sharing. 🙂
This looks like a lot of work but, the finished product is totally cool. A teen would love that. 🙂
These are such fun ideas. My mom threw me a sweet sixteen and I still think of it fondly. I am already planning to give my the daughter the ring I received at mine.
I love how striking the finished product looks, this is just so good.
Very cute! I’m sure they are a big hit with 16 YOs!
I love all the cricut projects people make and this one is so cute! I would love to make one of these for my daughter on her next b-day.
I need to make these when my daughter turns 16. What fabulous shirts!
I love this diy idea. I dont have those products, but sure I will buy it! The shirt look amazing. Love the gold combination. Thanks for sharing, is a great Idea for a birthday party, not only sweet 16!!
What a fabulous little machine! My daughter just spent a small fortune this past week ordering a group of T-shirts with gold lettering on them for her bridesmaids. If I had known about this little gem, I would have purchased it for her. I’m definitely keeping the Cricut in mind for future projects. 🙂
These shirts look awesome. I want to make these shirts for my little sister’s 16 birthday.
The t-shirt looks amazing. I wish I had a Circuit as well. I will enter the giveaway and maybe I will get lucky
This looks awesome! You did a great job 🙂 I’m sure if I tried something like this I would just mess it up! LOL
Louise x
This is such a cool device! I love what you can do with it. I may have to invest in a cricut to do cool things like this.
This is so cool! I love the shine from the foil.
Wow. This is crazy. I wonder what it’s like to have a party this big thrown for you..I did acid and went to a rave when I turned 16. No wait that was 15? I don’t remember my16th birthday;. hmm…well anyway, my husband has always wanted to make shirts! I don’t think we’ll be making these kinds but I’ll show him the tactic and see if he can do something with it.
Awesome post! Super amazing. The gold foil looks clean, and you can make stuff like this and sell it online!
Wow! This looks great. I need to give this a try someday.
I would love to have a cricut! And the gold foil is absolutely amazing! I love anything gold…or rose gold…right now 🙂
That looks so awesome. I can see using that for so many occasions.
I love that there is a matching sweet 16 shirt to match the rocking party. Cricut is really ideal for any scenario x
Thanks for these tips! Am definitely sold, i will ask my bf to buy me this machine for crafting.
I so want to have the cricut machine! Just imagine the many different shirts and dresses I can make for my daughter.
How cool! I bet this is lots of fun with the kids or for a hen party!
LOL…I can just imagine me trying to do this. I am so bad at anything DIY…so I steer clear…These look fabulous!
Oh, these turned out great. I absolutely love how shiny the gold turned out.
Such a great DIY idea! And they really turned out great!!
Such a wonderful simple DIY idea! And it turned out great, will have to keep this in mind!
I love the whole DIY aspect and I love love love that gold colour! Great as a pressie (or for myself…)
Katja xxx
http://www.katnapped.com